

What Is Web 3? Building DeFi With Rust and Ethereum
Part 1 (Sending Signed Transaction From Ethereum Node)


For numerous people, the internet is a wild space where information can be shared among each other. Also, with the internet comes freedom of speech. However, the last statement is partly true as freedom of speech isn't a hundred percent. This is because the internet can be censored and people who don't comply to laid down rules can be kicked out.
While this seems as an excellent idea in maintaining law and order, extremists can control the internet denying people from airing their views. For instance, Nigeria is deliberating on imposing the social media ban on citizens where they can't talk bad about a leader. This is clearly an infringement on democracy and it goes on to show how the internet doesn't promote freedom of speech.
In this article, we'll be discussing web 3, how it can't be censored like web 2 and how to build a decentralized finance with Rust and Ethereum.
Web 2 vs Web 3, What are They?
Web 2 is the internet that all know of. This consist of networks that consist of user generated content. It allows individuals communicate via social media. Just as discussed in our opening text, the technology can be censored.
What if the internet works in a decentralized network, how can it be censored? Well, this is what developers are working on, a web version where data will be interconnected in a decentralized way to avoid censorship. Also, file storage and sharing will be done in censorship-resistant methods. This is web 3, not does it promise non-censorship, it provides ubiquity. Ubiquity provides the ability to get data faster from the web, data is everywhere at the same time. Web 3 runs on blockchain, they're mostly decentralized apps.
Decentralized Apps (Dapps) are applications built on decentralized networks. They combine a smart contract and frontend interface. In the next section, we'll explore DeFi (decentralized finance) and how to build DeFi with Rust and Ethereum.
What Is DeFi
Decentralized finance is a way of executing financial transactions through a decentralized application. The major difference between decentralized finance and decentralized apps is that decentralized finance is a subset of decentralized apps. Decentralized finance are decentralized apps but not all decentralized apps are decentralized finance.
Building DeFi With Rust and Ethereum
Rust is gaining popularity for it's memory safety and has won the most loved language on Stack overflow for five times. For decentralized finance, memory safety is important as developers won't want memory leaks that'll cost users loss of money. With the availability of Ethereum's smart contract APIs, developers can now build DeFi easily. In this section, we'll discover how to build a simple DeFi with Ethereum.
Prerequisites
You need the following prerequisite to build a DeFi with Rust and Ethereum.
- Rust installed in your working environment and basic knowledge of Rust programming language.
Choosing An Ethereum Client
Before creating our Rust/Ethereum DeFi project, we'll need to choose an Ethereum client for our application. An Ethereum client is any node that can parse and verify blockchain, smart contract etc.
For this project, I'll be using the ganache server because it's easy to set-up and allows us to test our DeFi easily. To install the ganache CLI, run the command below in your terminal.
npm install -g ganache-cli
 After installation, we'll create a new Rust project where we'll put in our codes. Run the command below in your terminal to create a new Rust project.
//Use snake case for Rust names
cargo new ethereum_defi
 Now, we'll start a private Ethereum test account from our ganache-cli. Run the command below to start a pre-populated Ethereum account.
ganache-cli -d
You should get an output as the image below.
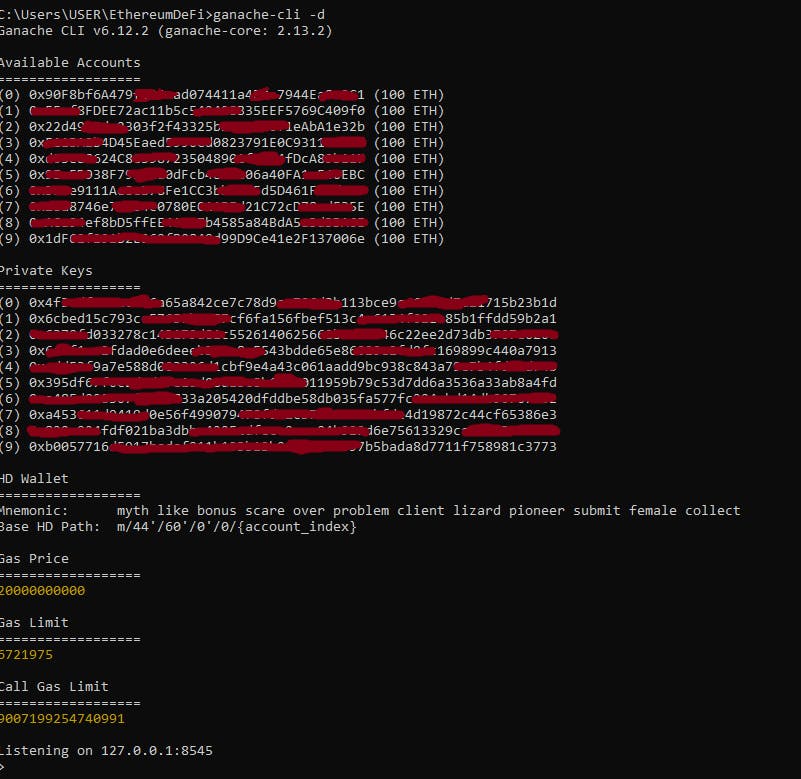
At this point, you should have two terminals running. Don't close your Rust terminal or ganache terminal. Next, we'll be writing codes to send ETH from our first account to second account. Recall we have nine accounts funded with 100 ETH respectively.
Sending and Signing a Transaction From Ethereum Node
Sending a transaction from the Ethereum node connection isn't a secure method. This is because if the transaction isn't unlocked on the node then transactions may be unaccounted for. However, sending a transaction from the Ethereum node connection is the easiest way to send a transaction. Let's explore sending a transaction from the Ethereum node connection.
Connecting to Ethereum Node
The first thing we'll be doing is declare dependencies in our cargo.toml file. Paste the code below in your cargo.toml file under [dependencies].
web3 = "0.14.0"
tokio = { version = "1.0", features = ["full"] }
The web3 crate is an Ethereum JSON-RPC client, it'll allow us access to the Ethereum smart contract. tokio allows us to perform async operation in our function fn since our transaction requires asynchronous operation.
Next, we'll write codes for our DeFi to send ETH from one account to another.
Sending Transaction
Since this is the first part of our project, we'll need to create another .rs file where we'll be writing our node signed transaction. Create a new file, name it nodesigned.rs. In nodesigned.rs, we'll declare our value type for web 3.
//call in web 3 and declare transaction value type.
use web3::types::{TransactionRequest, U256};
Next, we'll be creating our public function in our nodesigned.rs file so that we can easily call it into our main.rs file.
pub async fn main() -> web3::Result<()> {
//Declare web3 port
    let transport = web3::transports::Http::new("http://localhost:8545")?;
//Create new transport from port already declared
    let web3 = web3::Web3::new(transport);
//Connect to ETH accounts
    let mut accounts = web3.eth().accounts().await?;

//Let initial account be 100ETH from account 1
    let balance_before = web3.eth().balance(accounts[1], None).await?;

//Make transaction from account 0 to account 1
    let tx = TransactionRequest {
        from: accounts[0],
        to: Some(accounts[1]),
        gas: None,
        gas_price: None,
        value: Some(U256::from(10000)),
        data: None,
        nonce: None,
        condition: None
    };

//Retrieve transaction hash
    let tx_hash = web3.eth().send_transaction(tx).await?;

//Final balance
    let balance_after = web3.eth().balance(accounts[1], None).await?;

//Print hash, initial balance and final balance
    println!("TX Hash: {:?}", tx_hash);
    println!("Balance before: {}", balance_before);
    println!("Balance after: {}", balance_after);

       Ok(())
}
In your main.rs file, we'll call in our nodesigned.rs file and add tokio because our main function is async.
mod nodesigned;

#[tokio::main]
async fn main() {
    nodesigned::main().await.ok();
}
Now, if you run the code with cargo run you'll see that a new block of transaction to your DeFi.

Your initial and final balance will be logged in your Rust console.

Conclusion
Although DeFi makes it possible for data ubiquity, there's computation effort required to complete a transaction. This is the essence of gas fees, they are needed to complete a transaction. Just like cars that need gas to move, you need gas to make transactions. Gas fees keep the Ethereum network secure because longer computational time will require higher gas fees. This means cybercriminals can't spam the network with computational wastage or infinite loops.
In this article, we discussed the difference between web 2 and web 3. Also, we have created a simple DeFi to send a Node signed transaction with Rust and Ethereum. The link to the full code of this article can be found on GitHub .
In the next article, we'll explore a more secure way to send transactions in our Rust/Ethereum DeFi.