Building DeFi with Rust and Ethereum (Providers and Signers).
Part 2 (Web3 vs Ethers.js).


Creating decentralized applications in Ethereum is pretty easy these days as there are lot's of libraries to help you set up your Dapps. However, it's important that we understand the core concepts required when connecting to ethereum's blockchain.
In this article, we will look ethers.rs and web3.rs while exploring Ethereum's signers and providers.
What are Providers
Providers allow you to connect and communicate with the Ethereum blockchain. They provide an abstract connection to the Ethereum network to provide consistent interface to standard Ethereum node functionality.
Think of an abstraction as a simple interface covering a complex system. For instance, a car's system is complex (mechanical, electrical components etc). But it's interface is quite simple for user's to use.
Providers as an abstraction of connection to the Ethereum's network, creates a simple interface for connecting and communicating with the Ethereum's network. Web3 and ethers both utlilzes Providers to connect to Ethereum's network.
Providers in ethers.rs vs Web3.rs
In our first series, I illustrated ETH transfer with web3.rs. Both web3.rs and ethers.rs are crates that aim to simplify interacting with Ethereum.
However, ethers.rs is very lightweight and creates a distinction as to what Providers and Signers can do. For instance, in ethers.rs, you need a provider to make a connection with Ethereum or your blockchain emulator.
let provider = Provider::<Http>::try_from("http://localhost:8545")?;
Nonetheless, if you need to make a connection with your Ethereum or your blockchain emulator, you'll need to create a new web3 instance.
let transport = web3::transports::Http::new("http://localhost:8545")?;
What are Signers
A signer is an abstraction of an Ethereum account that let's you to sign messages and transactions. With signers, you can send signed transaction to the Ethereum network. The importance of signing a transaction is that you won't need to worry about exposing your private key. This is because with unsigned transactions, cyber-criminals can derive your private key from your public key since Ethereum uses ECDSA (Elliptic Curve Digital Signature Algorithm) for it's public-key cryptography.
Signers in ethers.rs vs Web3.rs
The way ethers.rs signs transactions is with the use of signers. To sign your transaction with ethers.rs, you'll create a signer with some random numbers.
// Generate a wallet of random numbers
let wallet = LocalWallet::new(&mut thread_rng());

// sign message with wallet and print out signature produced.
let signature = wallet.sign_message(message).await?;
println!("Produced signature {}", signature);
In web3.rs, signing transactions doesn't require a signer. You can sign transactions in web3.rs with an account.
let mut accounts = web3.eth().accounts().await?;
Transferring ETH with ethers.rs
In my last article, I talked about transfering ETH with web3.rs. In this section, we'll look at transfering ETH with web3.rs. Follow the steps below to transfer ETH with ethers.rs.
First, add the following dependencies to your cargo.toml file.
ethers = "0.2.2"
anyhow = "1.0"
tokio = { version = "1.0", features = ["full"] }
Next, in your transfer.rs file, put in the code below.
// Import crates
use anyhow::Result;
use ethers::{prelude::*};
use std::convert::TryFrom;

pub async fn transfers() -> Result<()> {

    // Connect to the ethereum network with ganache-cli
    let provider = Provider::<Http>::try_from("http://localhost:8545")?;
    // Get accounts
    let accounts = provider.get_accounts().await?;
    let from = accounts[0];
    let to = accounts[1];

    // Make transaction requests from accounts.
    let tx = TransactionRequest::new().to(to).value(1000).from(from);

    // Get initial balance
    let balance_before = provider.get_balance(from, None).await?;

    //Make Transaction
    let tx = provider.send_transaction(tx, None).await?;


    println!("TX Hash: {:?}", tx);

    // Get transaction count
    let nonce1 = provider
        .get_transaction_count(from, Some(BlockNumber::Latest.into()))
        .await?;

    let nonce2 = provider
        .get_transaction_count(from, Some(BlockNumber::Number(0.into()).into()))
        .await?;

        assert!(nonce2 < nonce1);

    //Get final balance
    let balance_after = provider.get_balance(from, None).await?;
    assert!(balance_after < balance_before);

    println!("Balance before {}", balance_before);
    println!("Balance after {}", balance_after);

    Ok(())
}
Make sure ganache-cli is running in your local environment. To start ganache-cli, run the command below.
ganache-cli -d
Replace the code in your main.rs file with the code belo.
mod transfer;

#[tokio::main]
async fn main() {
    transfer::transfers().await.ok();
}
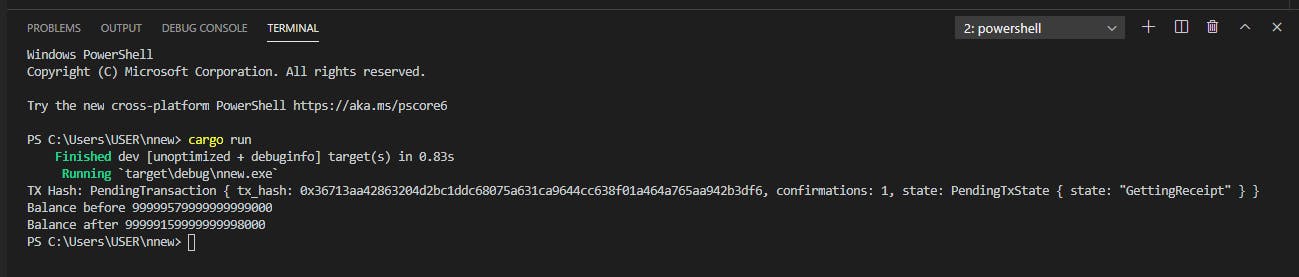
When you run the command above with cargo run, you should get a printout of your initial and final balance.
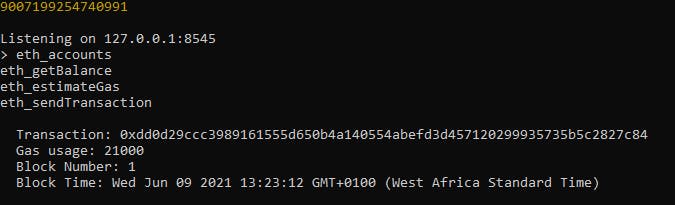
Your ganache-cli terminal will register the transaction.
Conclusion
While web3.js is very popular, ethers.js is a lightweight library that can be used as an alternative. There are bunch of web3.js and ethers.js implementations for different languages like web3.py, web3.rs, ethers.py, ethers.rs.
Many developers will always go for ethers.rs because of it's simplicity and how it handles key management and state - separation of concerns.
In this article, we have explored signers and providers and how they relate to web3.rs and ethers.rs. If you want to get deeper understanding of web3 and the ethers library, this article from infura is a great fit for you. The codes for this example can be found on GitHub.