

In the course of trying out new things, I came across this amazing language Rust. Rust is an open source language that syntactically looks like C++. Now, you may begin to wonder why me, a JavaScript developer would want to get involved with a language that is similar to C++?
Rust was built for performance and safety, most especially for memory safety and concurrency. And yes, just like Node.js Rust can be used as backend for your web applications. Only this time, your application's safety is super guaranteed. This article talks more on what Rust has to offer.
This article is for beginner and midlevel developers who are trying out Rust for the first time or have little knowledge on what to do with Rust. So, every detail about creating your first project to implementing CRUD will be covered. Let's get to today's business, creating a simple CRUD operation with Rust.
Setting Up Application
To follow this Rust project, you need the following prerequisites:
- Rust installed in your working environment. If you are not certain about having Rust in your computer, run the command below.
cargo --version
The command above should display the version of Rust installed in your computer. If it throws an error, you don't have Rust installed.
- You need to have C++ build tools installed on your system. Else, when you try to run your project, you would get the error below.
error: linker `link.exe` not found
Download the latest version of Microsoft visual studio build tools and follow the steps in this article to get C++ build tools installed on your system.
Creating a Project
After Installing Rust, the next step is to create a project. Creating a Rust project takes seconds. You can create either a library project or a binary project depending on the use case of the project.
A binary project is a project that compiles into an executable file that will be present only in your system or co-workers system. To create a binary project run the command below in your terminal:
cargo new Your_Project_Name

or

cargo new Your_Project_Name --bin
However, a library project is a type of project that compiles into a software artifact. That is, a by-product of software development that is created for the development of a software—more like a dependency. You can create a library project with the command below:
cargo new Your_Project_Name --lib
I am using Windows 10 OS for this project, the project I created is a binary project since I am not planning on creating a dependency—just a simple CRUD operation. I used windows command prompt to create my binary project, I also use VScode to run my codes.
Creating Your First Rust Web Application
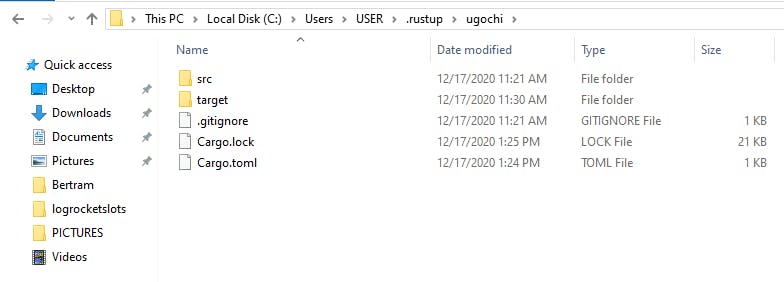
At this point, we should have a file structure like the image shown below.
 If you try to run your project at this point with the
 cargo run command, you should get a "Hello, world" response.
Installing dependencies in Rust is quite interesting. Instead of running the Npm install command like JavaScript, all you need to do is add the dependency to your Cargo.toml file.
For instance, our CRUD operation allows us to (C)reate and (R)ead data. To do this, we would use Rocket. Rocket is a web framework for Rust nightly that allows us to create fast, flexible and secure web applications. With this framework, we can create and read data from our web application. Let's create a simple application that allows us to get data from our web application by creating data in our application route.
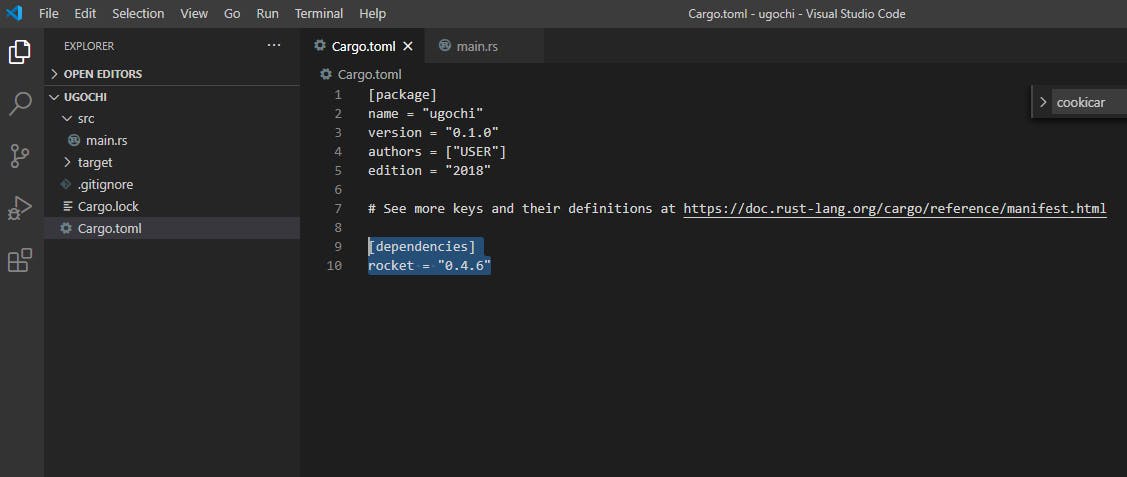
To add this dependency to our application, add the following to the dependencies section of your Cargo.toml file:
[dependencies]
// Latest version of rocket
rocket = "0.4.6"
Your Cargo.toml should look like the image below now.
 Add the following code to your
 "src/main.rs" file
// Since we are using a nightly version of rust, this line enables unstable attributes
#![feature(proc_macro_hygiene, decl_macro)]

// Allow this file use the external crate rocket
#[macro_use] extern crate rocket;

// Implement a simple get request to read users name and country
#[get("/<name>/<country>")]
// Create a function to create and read data in route
fn rusttest(name: String, country: String) -> String {
    format!("My name is {}, I am {}!", name, country)
}

// This function calls rusttest and attach route link
fn main() {
    rocket::ignite().mount("/rusttest", routes![rusttest]).launch();
}
Run this code with the cargo run command.
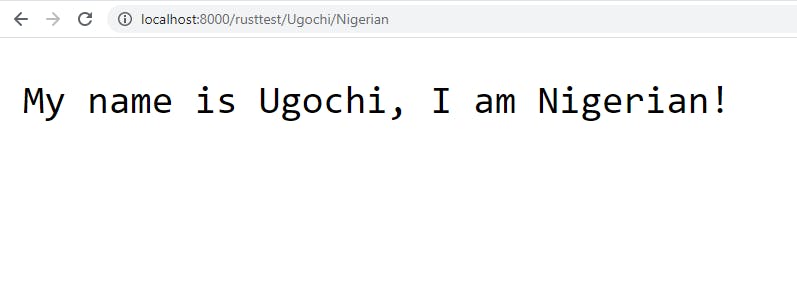
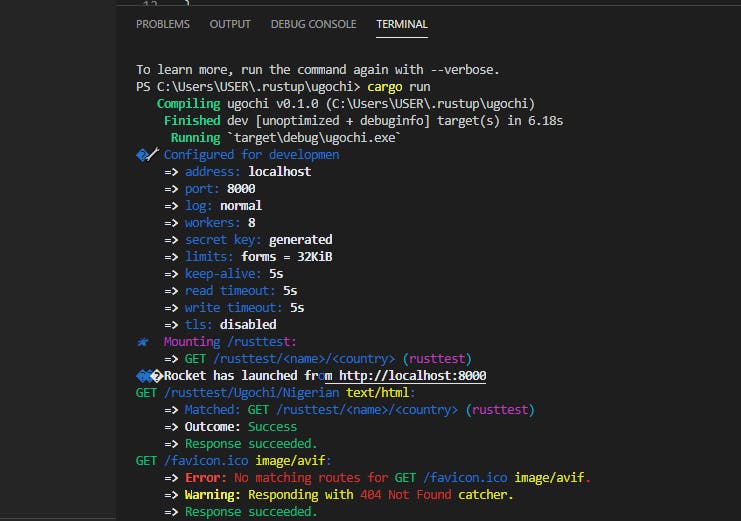 Navigate to localhost:8000/rusttest/Name/Country. For example, localhost:8000/rusttest/Ugochi/Nigerian will output the result below
Running this code may throw this error
Error: Pear requires a 'dev' or 'nightly' version of rustc.. What this simply means is that you don't have Rust 'nightly' version installed in your computer. To solve this problem, run this code in your terminalrustup default nightly-x86_64-pc-windows-gnu. Once installation is complete, run the code again withcargo run.
We have successfully created our first Rust web application with Rocket also, we have created and Read data from our routes. Next, we would look at how to create, read, update and delete real data. This article would use data from a JSON file, although the next session will talk about CRUD application from a database.
CRUD Operation from JSON File as Mock Database
First, we will install the following dependencies by adding them in our Cargo.toml file
[dependencies]
serde = "1.0"
serde_json = "1.0"
serde_derive = "1.0.118"

[dependencies.rocket_contrib]
version = "*"
default-features = false
features = ["json"]
serde is a framework that is mostly used for serializing deserializing Rust data. With this framework, you can point data to a number. To call the data, all you need to do is to call the number. serde_json allows you to read data in JSON format while serde_derive allows you to generate implementation of the Serialize and Deserialize traits from serde.
Next, we would create a .rs file in src folder to place our JSON data into. The name of my file is ugochi.rs.
// Create public struct for JSON data
#[derive(Serialize, Deserialize)]
pub struct Ugochi {
    pub id: Option<i32>,
    pub name: String,
    pub country: String,
    pub age: i32
}
Now, we would create our CRUD operations in our main.rs files.
#![feature(proc_macro_hygiene, decl_macro)]
#[macro_use] extern crate rocket;
#[macro_use] extern crate rocket_contrib;
#[macro_use] extern crate serde_derive;
// Import model module
mod ugochi;
use ugochi::{Ugochi};
use rocket_contrib::json::{Json, JsonValue};
// Create function to upload data (Create)
#[post("/", data = "<ugochi>")]
fn create(ugochi: Json<Ugochi>) -> Json<Ugochi> {
ugochi
}
// Create function to read record from JSON file (Read)
#[get("/")]
fn read() -> JsonValue {
json!([
"ugochi 1",
"ugochi 2"
])
}
// Create function to update record in JSON file (Update)
#[put("/<id>", data = "<ugochi>")]
fn update(id: i32, ugochi: Json<Ugochi>) -> Json<Ugochi> {
ugochi
}
// Create function to delete record (Delete)
#[delete("/<id>")]
fn delete(id: i32) -> JsonValue {
json!({"status": "ok"})
}
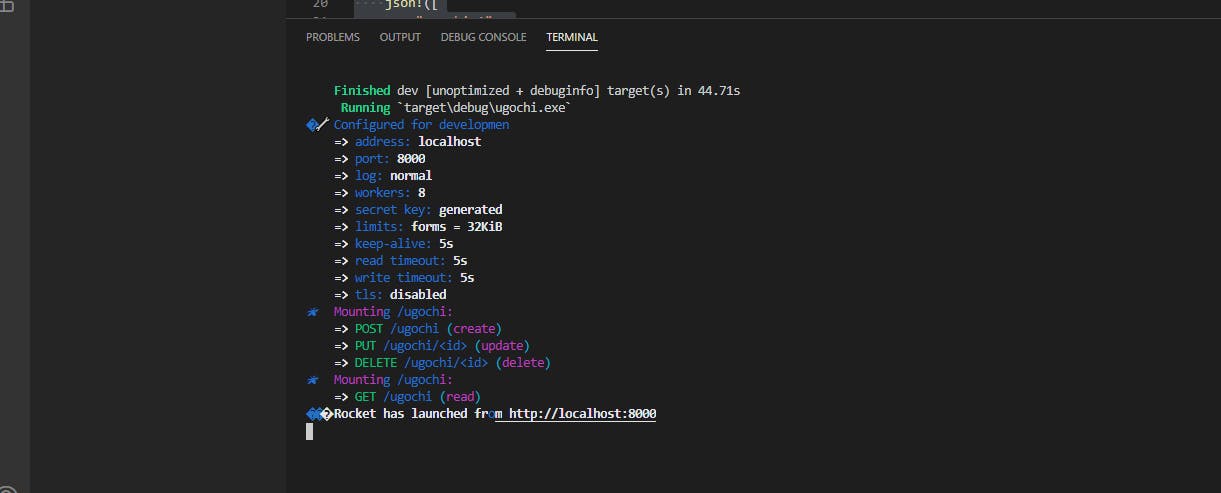
fn main() {
rocket::ignite()
.mount("/ugochi", routes![create, update, delete])
.mount("/ugochi", routes![read])
.launch();
}
You have successfully created a simple CRUD operation with Rust from scratch. You can test these operations with any API end point test tools. For me, I use postman for my API tests.
The Best Part
In this article, we have created a simple CRUD application from scratch using Rust. However, I know you are beginning to wonder why you should not stick to using Node.js and what really Rust has to offer. Authentication comes with serious need of safety. The safety Rust provides is authentic when compared to Node.js. For instance, Rust offers memory and thread saftey which Node.js does not offer. Also, Rust applications are faster (speed) when compared to Node.js application.
The next article on the series will talk about implementing authentication with Rust. This article will be updated with a link to the next series once the next series is published.