


Rust is not only getting a lot of attention because of it's memory safety and high performance ability. Rust developers also don't have to worry about low level details. For instance, Rust allows developers to store data on the stack or on the heap and determines at compile time which memory can be cleaned up. These reasons and more, are why developers like me love Rust
It is quite tiring when developers have to change usernames and passwords whenever an employee is employed, promoted, demoted or fired. Sometimes, according to compliant laws (PHI and PCI) firms will want to restrict which user accesses some sensitive data.
The solution to these problems is to implement Role Based Access Control (RBAC). This way, when employees turn on their PC and connect to the company's server, they are logged in based on their role and can only access information specific to their role.
The method most developers use to implement authorization, is to store sessions in browser while employing an authentication filter. This method doesn't only require a lot of work, it is impossible to achieve Role Based Access Control. For instance, as roles increase, the rules become larger and difficult to manage.
The best way to implement RBAC, is to employ the service of an authorization policy engine that handles authorization outside of business logic like Oso. Oso allows developers to implement authorization into their application seamlessly. It uses polar programming language which is a declarative policy language to express authorization logic.
This article uses Oso for RBAC, Rust for backend and Vue.js for frontend. In this article, we would look at how to implement global roles for RBAC.
First, we would create an application like the rust quick start, and implement user role based access control in our application.
Creating Rust Project
Prerequisites
This article assumes that you have the following installed in your system.
Rust installed in your working environment.
Node.js and Vue CLI installed in your working environment since we will be using NPM for our frontend.
To create a Rust based project, let's run the following command on our command prompt.
cargo new Your_Project_Name
This project will hold a medical company's sensitive data like the list of jobs completed, with the name of the employee who submits (concludes) the job.
Add the following dependencies to your Cargo.toml file:
lazy_static = "1.4.0"
rocket = "0.4.5"
oso = "0.6.0-alpha"
oso-derive = "0.6.0-alpha"
Creating Company's Record
Let's dive into creating data for company's completed jobs. We would create a file and name it jobs.rs in src/ and hot code jobs completed by our medical firm into it.
// modules this file will use
use lazy_static::lazy_static;
use std::fmt;
use std::string::ToString;
use std::collections::HashMap;

use oso::*;

// require codes to be executed at runtime in order to be initialized
lazy_static! {
//  HashMap will be evaluated once and stored behind a global static reference
    pub static ref DB: HashMap<usize, Job> = {
        let mut db = HashMap::with_capacity(4);
// Insert completed jobs into database
        db.insert(1, Job::new("Mr. John Cole", "Treating Patient From Flu", "Flat 2, Eastern New York",
  "alice@example.com"));
        db.insert(2, Job::new("Ms. Gwen Hade", "Helping patient stay fit", "Flat 7, Eastern New York",
  "alice@example.com"));
        db.insert(3, Job::new("Mr. Fahad Abdul", "Providing Vaccine for patient", "Flat 20, Western New York",
  "alice@example.com"));
        db.insert(4, Job::new("Mrs. Jenny Cole", "Providing Cancer Drugs for patient", "Flat 2, Eastern New york",
  "alice@example.com"));
        db
    };
}

// Declare public struct for DB structure
#[derive(PolarClass, Debug, Clone)]
pub struct Job {
    pub name: String,
    pub description: String,
    pub address: String,
    #[polar(attribute)]
    pub submitted_by: String,
}

// Define implementaion of record type
impl Job {
    pub fn new(name: &str, description: &str, address: &str, submitted_by: &str) -> Self {
        Self {
            name: name.to_string(),
            description: description.to_string(),
            address: address.to_string(),
            submitted_by: submitted_by.to_string(),
        }
    }
}

// Format to display jobs
impl fmt::Display for Job {
    fn fmt(&self, f: &mut fmt::Formatter<'_>) -> fmt::Result {
        write!(
            f,
            "Job(name='{}', description='{}', address='{}', submitted_by='{}')",
            self.name, &self.description, &self.address, &self.submitted_by
        )
    }
}
Next, we would create our server where our business logic will be implemented. We would start by creating a file in src/ and name it server.rs. This is where all our business logic will be. Just as we agreed in our opening sentence, there would be no authorization logic in our business logic.
// modules this file will use
use std::sync::{Arc, Mutex};

use rocket::get;
use rocket::http::Status;
use rocket::request::{self, FromRequest, Request, State};

use oso::{Oso, PolarClass};

use crate::jobs::{Job, DB};

#[derive(Debug)]
struct User(String);

impl<'a, 'r> FromRequest<'a, 'r> for User {
    type Error = String;

    fn from_request(request: &'a Request<'r>) -> request::Outcome<Self, Self::Error> {
        if let Some(user) = request.headers().get_one("user") {
            request::Outcome::Success(User(user.to_string()))
        } else {
            request::Outcome::Failure((Status::Forbidden, "Unknown User".to_owned()))
        }
    }
}

// Catch error whenever user tries to get a restricted route or document
#[catch(403)]
fn not_authorized(_: &Request) -> String {
    "Not Authorized!\n".to_string()
}

// Catch error whenever user inputs a non-valid URL
#[catch(404)]
fn not_found(_: &Request) -> String {
    "Not Found!\n".to_string()
}

// Get method to retrieve firm's jobs
#[get("/jobs/<id>")]
fn get_job(oso: State<OsoState>, user: User, id: usize) -> Result<Option<String>, Status> {
    if let Some(job) = DB.get(&id) {
// If user is allowed, get file/document
        if oso.is_allowed(user.0, "GET", job.clone()) {
            Ok(Some(format!("{}\n", job)))
// If they are not allowed throw 403 error
        } else {
            Err(Status::Forbidden)
        }
    } else {
        Ok(None)
    }
}

// Declare structure for oso state
struct OsoState {
    oso: Arc<Mutex<Oso>>,
}

// Define implementation type for oso state
impl OsoState {
    pub fn is_allowed(&self, actor: String, action: &str, resource: Job) -> bool {
        let mut guard = self.oso.lock().unwrap();
        guard
            .is_allowed(actor, action.to_string(), resource)
            .unwrap()
    }
}

//public function for oso
pub fn oso() -> Oso {
    let mut oso = Oso::new();

    oso.register_class(Job::get_polar_class()).unwrap();
// get jobs.polar file
    oso.load_file("jobs.polar").unwrap();

    oso
}

// public function for rocket
pub fn rocket(oso: Oso) -> rocket::Rocket {
    let oso_state = OsoState {
        oso: Arc::new(Mutex::new(oso)),
    };

    rocket::ignite()
        .mount("/", routes![get_job])
        .manage(oso_state)
        .register(catchers![not_authorized, not_found])
}

// allow rocket launch oso
pub fn run() {
    rocket(oso()).launch();
}

mod test {
    use super::{oso, rocket};
    use rocket::http::{Header, Status};
    use rocket::local::Client;

    #[test]
    fn get_job_no_rules() {
        let client = Client::new(rocket(oso())).expect("valid rocket instance");
        let response = client.get("/jobs/1").dispatch();
        assert_eq!(response.status(), Status::Forbidden);
    }

    #[test]
    fn get_job_first_rule() {
        let mut oso = oso();
        oso.load_str(
            "allow(actor: String, \"GET\", _job: Job) if actor.ends_with(\"@example.com\");",
        )
        .unwrap();
        let client = Client::new(rocket(oso)).expect("valid rocket instance");
        let mut request = client.get("/jobs/1");
        request.add_header(Header::new("user", "alice@example.com"));
        let ok_response = request.dispatch();
        assert_eq!(ok_response.status(), Status::Ok);
        let unauthorized_response = client.get("/jobs/1").dispatch();
        assert_eq!(unauthorized_response.status(), Status::Forbidden);
    }

    #[test]
    fn get_job_second_rule() {
        let mut oso = oso();
        oso.load_str(
            "allow(actor: String, \"GET\", job: Job) if job.submitted_by = actor;",
        )
        .unwrap();
        let client = Client::new(rocket(oso)).expect("valid rocket instance");
        let mut request = client.get("/jobs/1");
        request.add_header(Header::new("user", "alice@example.com"));
        let ok_response = request.dispatch();
        assert_eq!(ok_response.status(), Status::Ok);

        let mut bad_request = client.get("/jobs/3");
        bad_request.add_header(Header::new("user", "alice@example.com"));
        let unauthorized_response = bad_request.dispatch();
        assert_eq!(unauthorized_response.status(), Status::Forbidden);
    }
}
Now that we have created our business logic and added Oso and our Jobs model to it we have to make sure that main.rs runs our server when we start our project. To do this, add this code to your main.rs file.
#![feature(proc_macro_hygiene, decl_macro)]

#[macro_use]
extern crate rocket;

mod jobs;
mod server;

// run server
fn main() {
    server::run();
}
At this point, we are almost done with our backend. But as you can see, we haven't specified any configuration parameter like path for rocket. Also, remember that we haven't written our authorization logic and there's no way this application will be a success without it.
To specify route path for our application, create a file in the root of your application and name it Rocket.toml. Add the following to Rocket.toml:
// set development port
[development]
port = 3000
Now, if we start our application with cargo run we would see that our application is live at http://localhost:3000/jobs/<id>. Where is any number from 1-4 since we have four job records in the firm's database and each record has a number from 1 respectively. You can test your application by navigating to http://localhost:3000/jobs/<id> in your web browser or with cURL curl localhost:3000/jobs/<id>
However, what we see on our screen is "Not Authorized!" while trying to display any of the jobs our firm has completed. This is because Oso is set to "deny-by-default". To allow a specific user access this record based on their role, we need to add an authorization logic in application.
Create a file in the root of your project and name it jobs.polar. This file will contain our role base access control logic for our users.
For instance, if we add the block of codes below to our jobs.polar file, we would be registering an employee Gray as an admin and giving him access to retrieve all of the company's job.
// Grant Gray admin role
role(actor: String, "admin") if
    actor = "Gray";

// Allow admin retrieve company's jobs
allow(actor: String, "GET", _job: Job) if
    role(actor, "admin");
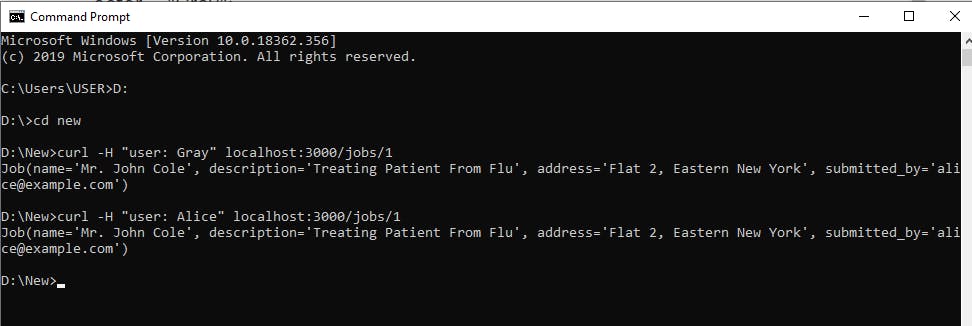
Use this command with cURL to add the employee's name as a header while trying to get firm's job. curl -H "user: Gray" localhost:3000/jobs/1
 Please, note that actor's value is case sensitive therefore Gray is not the same as gray.
We can also assign the same role to more than one user. For example we can make
Please, note that actor's value is case sensitive therefore Gray is not the same as gray.
We can also assign the same role to more than one user. For example we can make Gray and Alice admins and Grant them access to all of the company's job.
// Assign roles to admins
role(actor: String, "admin") if
    actor = "Gray" or
    actor = "Alice";

// Grant admin privilege of retrieving company's job.
allow(actor: String, "GET", _job: Job) if
    role(actor, "admin");
When you change the header to Gray or Alice, you will be able to retrieve any of the firm's completed job.
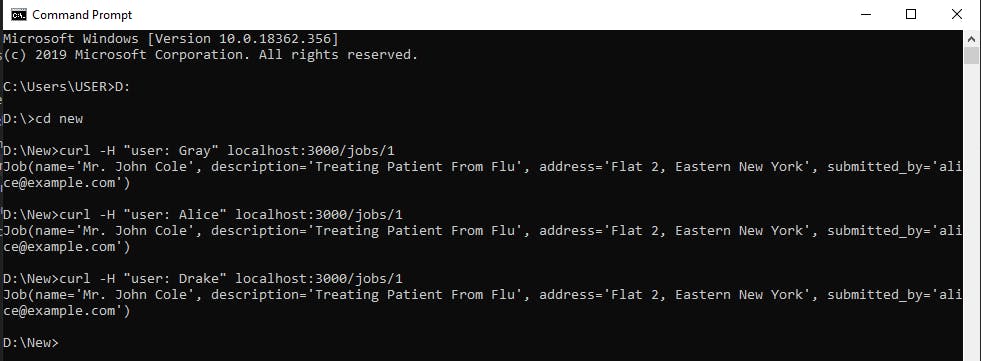
 Another way to use Oso authorization is to grant different role type to all our employees.
// Assign roles to admins
role(actor: String, "admin") if
    actor = "Gray" or
    actor = "Alice";

// Assign roles to receptionist
role(actor: String, "receptionist") if
    actor = "Drake";
// Give receptionist the same privilege of admin
    role(actor, "admin");

// Grant admin privilege of retrieving company's job. Receptionist can also retrieve company's jobs since they have been granted the same access as the admin
allow(actor: String, "GET", _job: Job) if
    role(actor, "admin");
We have given our employees different roles like admins and a receptionist. But, we have also written a rule that allows the receptionist the same privilege to perform the same actions as an admin.
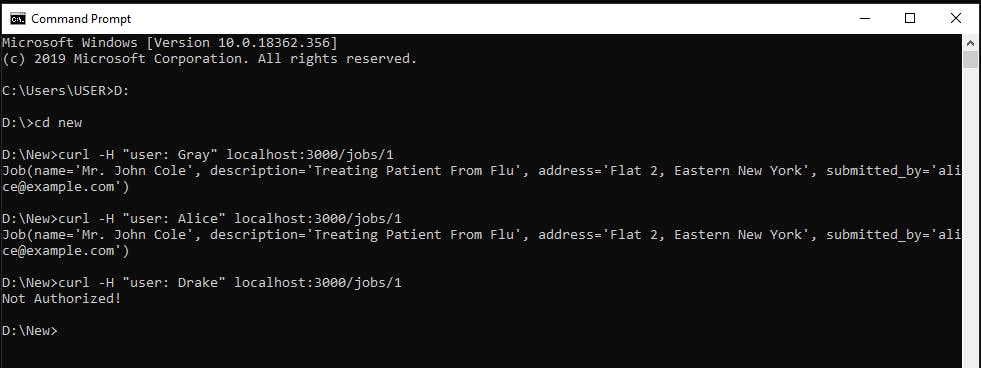
We can also grant employees different access based on their role
// Assign roles to admins
role(actor: String, "admin") if
    actor = "Gray" or
    actor = "Alice";

// Assign roles to receptionist
role(actor: String, "receptionist") if
    actor = "Drake";

// Grant admins privilege to retrieve firm's jobs
allow(actor: String, "GET", _job: Job) if
    role(actor, "admin");

// Grant receptionist privilege to view firm's jobs
allow(actor: String, "view", _job: Job) if
    role(actor, "receptionist");
In the example above, Alice and Gray as admins will have access to retrieve all the companys jobs while Drake the receptionist will only be able to view the companys jobs.
Now, our application's backend is functional. But, every time an employee tries to login into their system, they have to write scripts with cURL. I must say that this is a very bad practice for a medical firm. Here's what we are going to do, we would create a front end for our application. So that, all an employee has to do is input there name in the application and get logged in to get files allowed by their roles.
The front end frame work we would be working with is Vue. js.
Create a new Vue project with this command vue create osofront. If your project is created successfully, it should be live at http://localhost:8080/. Use Ctrl+C to stop your project, install bootstrap and axios with this command
npm i axios

npm i bootstrap
Add the modules bootstrap you installed to src/main.js like this:
import bootstrap from 'bootstrap/dist/css/bootstrap.css'

new Vue({
   bootstrap
})
Then, rename the file helloworld in src/components/ to appfront and delete its content. Add the following codes to it, to create our application frontend
<template>
  <div class="hello">
    <h1> Welcome To Our Medical Firm</h1>
<form>
  <div class="form-group">
    <label for="exampleFormControlInput1">First Name</label>
    <input type="text" class="form-control" v-model="name" id="exampleFormControlInput1" placeholder="Your Name">
  </div>
  <div class="form-group">
    <label for="exampleFormControlInput1">Job ID</label>
    <input type="number" class="form-control" v-model="id" id="exampleFormControlInput1" placeholder="Job ID">
  </div>
  <button type="button" @click="submit" class="btn btn-primary">Enter</button>
  </form>
  </div>
</template>

<script>
// Import axios from it's module
import axios from "axios"
export default {
  name: 'Appfront',
    data () {
    return {
// Return Job's ID and employees name
      id: '',
      name: ''
    }
    },
      methods: {
// Once employee hits the enter button, create a get request with axios
    submit() {
      axios({
// URL for get request should contain Job's ID
        url: `http://localhost:3000/jobs/${this.id}`,
        method: "GET",
// Add header for get request with user's name
        headers: { 'user': this.name },
      })
        .then(response => {console.log(response)})
    }
      }
}
</script>

<style scoped>
.hello{
  width:86%;
  margin:auto;
}

.btn{
  width: 40%;
  margin-left: 30%;
  margin-right: 30%;
  margin-bottom: 100px;
  margin-top: 50px;
}
</style>
In the file App.vue, delete it's content and replace with the block of code below:
<template>
  <div id="app">
    <img alt="Vue logo" src="./assets/logo.png">
// Display Appfront template here
    <Appfront/>
  </div>
</template>

<script>
// Import Appfront component into App.vue
import Appfront from './components/Appfront.vue'

export default {
  name: 'App',
  components: {
    Appfront
  }
}
</script>

<style>
#app {
  font-family: Avenir, Helvetica, Arial, sans-serif;
  -webkit-font-smoothing: antialiased;
  -moz-osx-font-smoothing: grayscale;
  text-align: center;
  color: #2c3e50;
  margin-top: 60px;
}
</style>
Now, If we navigate to http://localhost:8080/ you should see the page below.
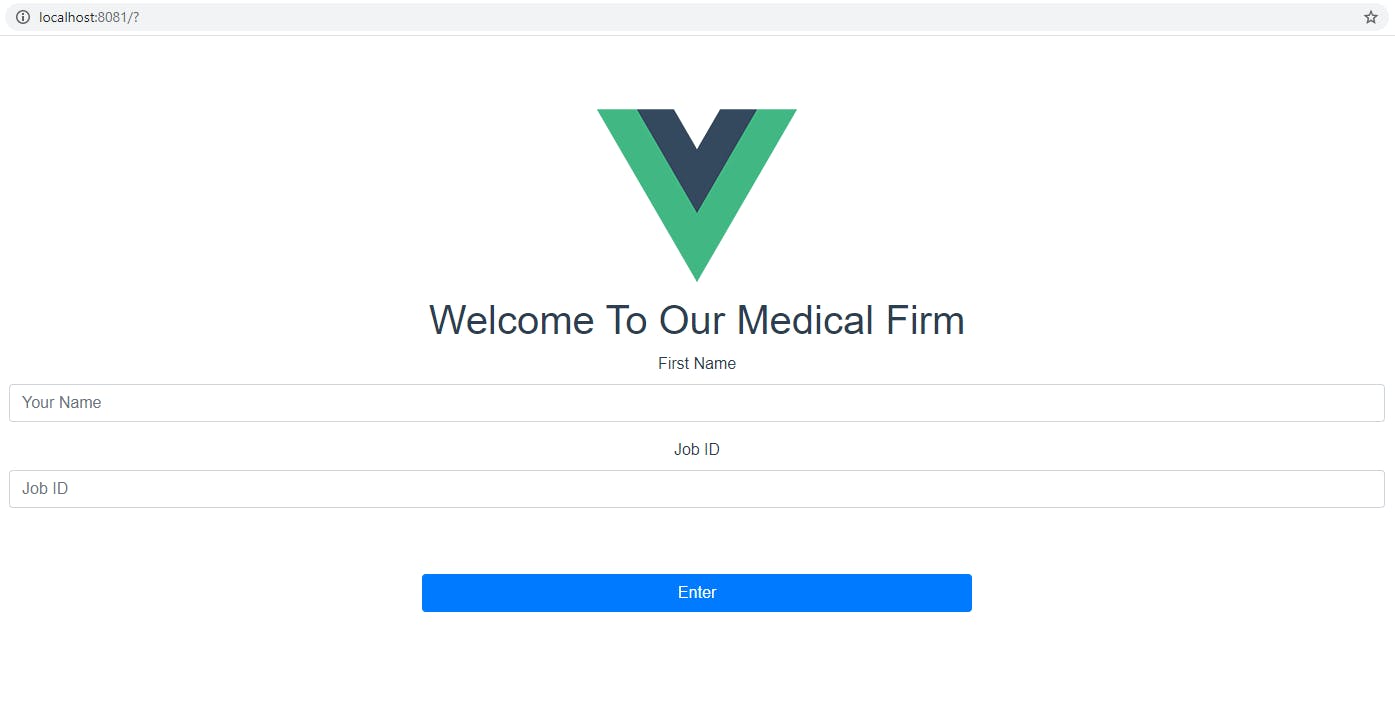
Input any of the employees name from admin to the receptionist, put in an ID from 1-4 and hit the enter button. Now, our application behaves exactly as our Rust backend. Just that this time, all employees need to do is input their names rather than dealing with cURL and headers.
Conclusion
In this article we have seen what role based authorization is and how to implement it with Oso in a Rust based application. We have also explored how to create roles and implement rules.
This application is an example of global roles. In global roles, roles don't apply only to a specific domain, but to the entire application. Oso also allows developers the flexibility of implementing RBAC for roles in a multi-tenant application, role Hierarchies, resource-specific roles, Using roles with user groups, and Implied roles. Oso has amazing libraries and tools, to get better understanding on amazing things you can us Oso for, read about Oso's use cases. For reference purpose, the completed repository from this project can be found here